Installation & Setup
Instructions for installing and tuning your restored carburetors.
Solex Install · Solex Float Setting · Throttle Body · Altitude Adjustment
Solex Installation
This information is provided here for your reference, and will also be included with your newly restored carbs. All restored carburetors have had their float levels and injection set, as well as been synchronized for air flow. Most find them to be "bolt and go" with only minor adjustments of the volume control screws. Should you find you need more than this simple adjustment please CALL US FIRST. It is easier to diagnose a situation if we know the starting point.

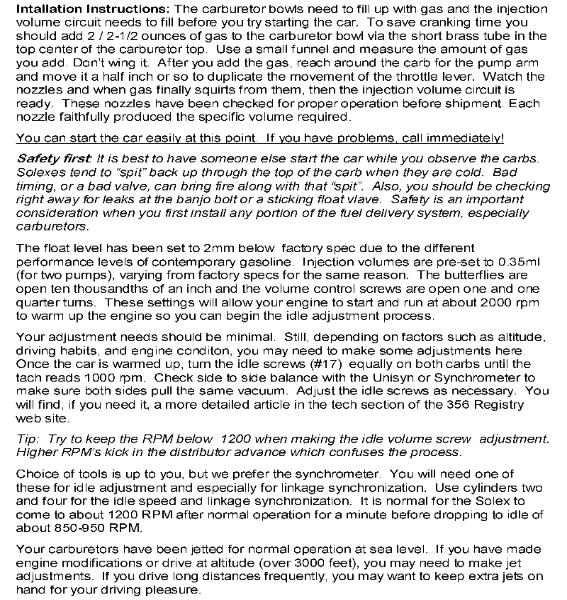
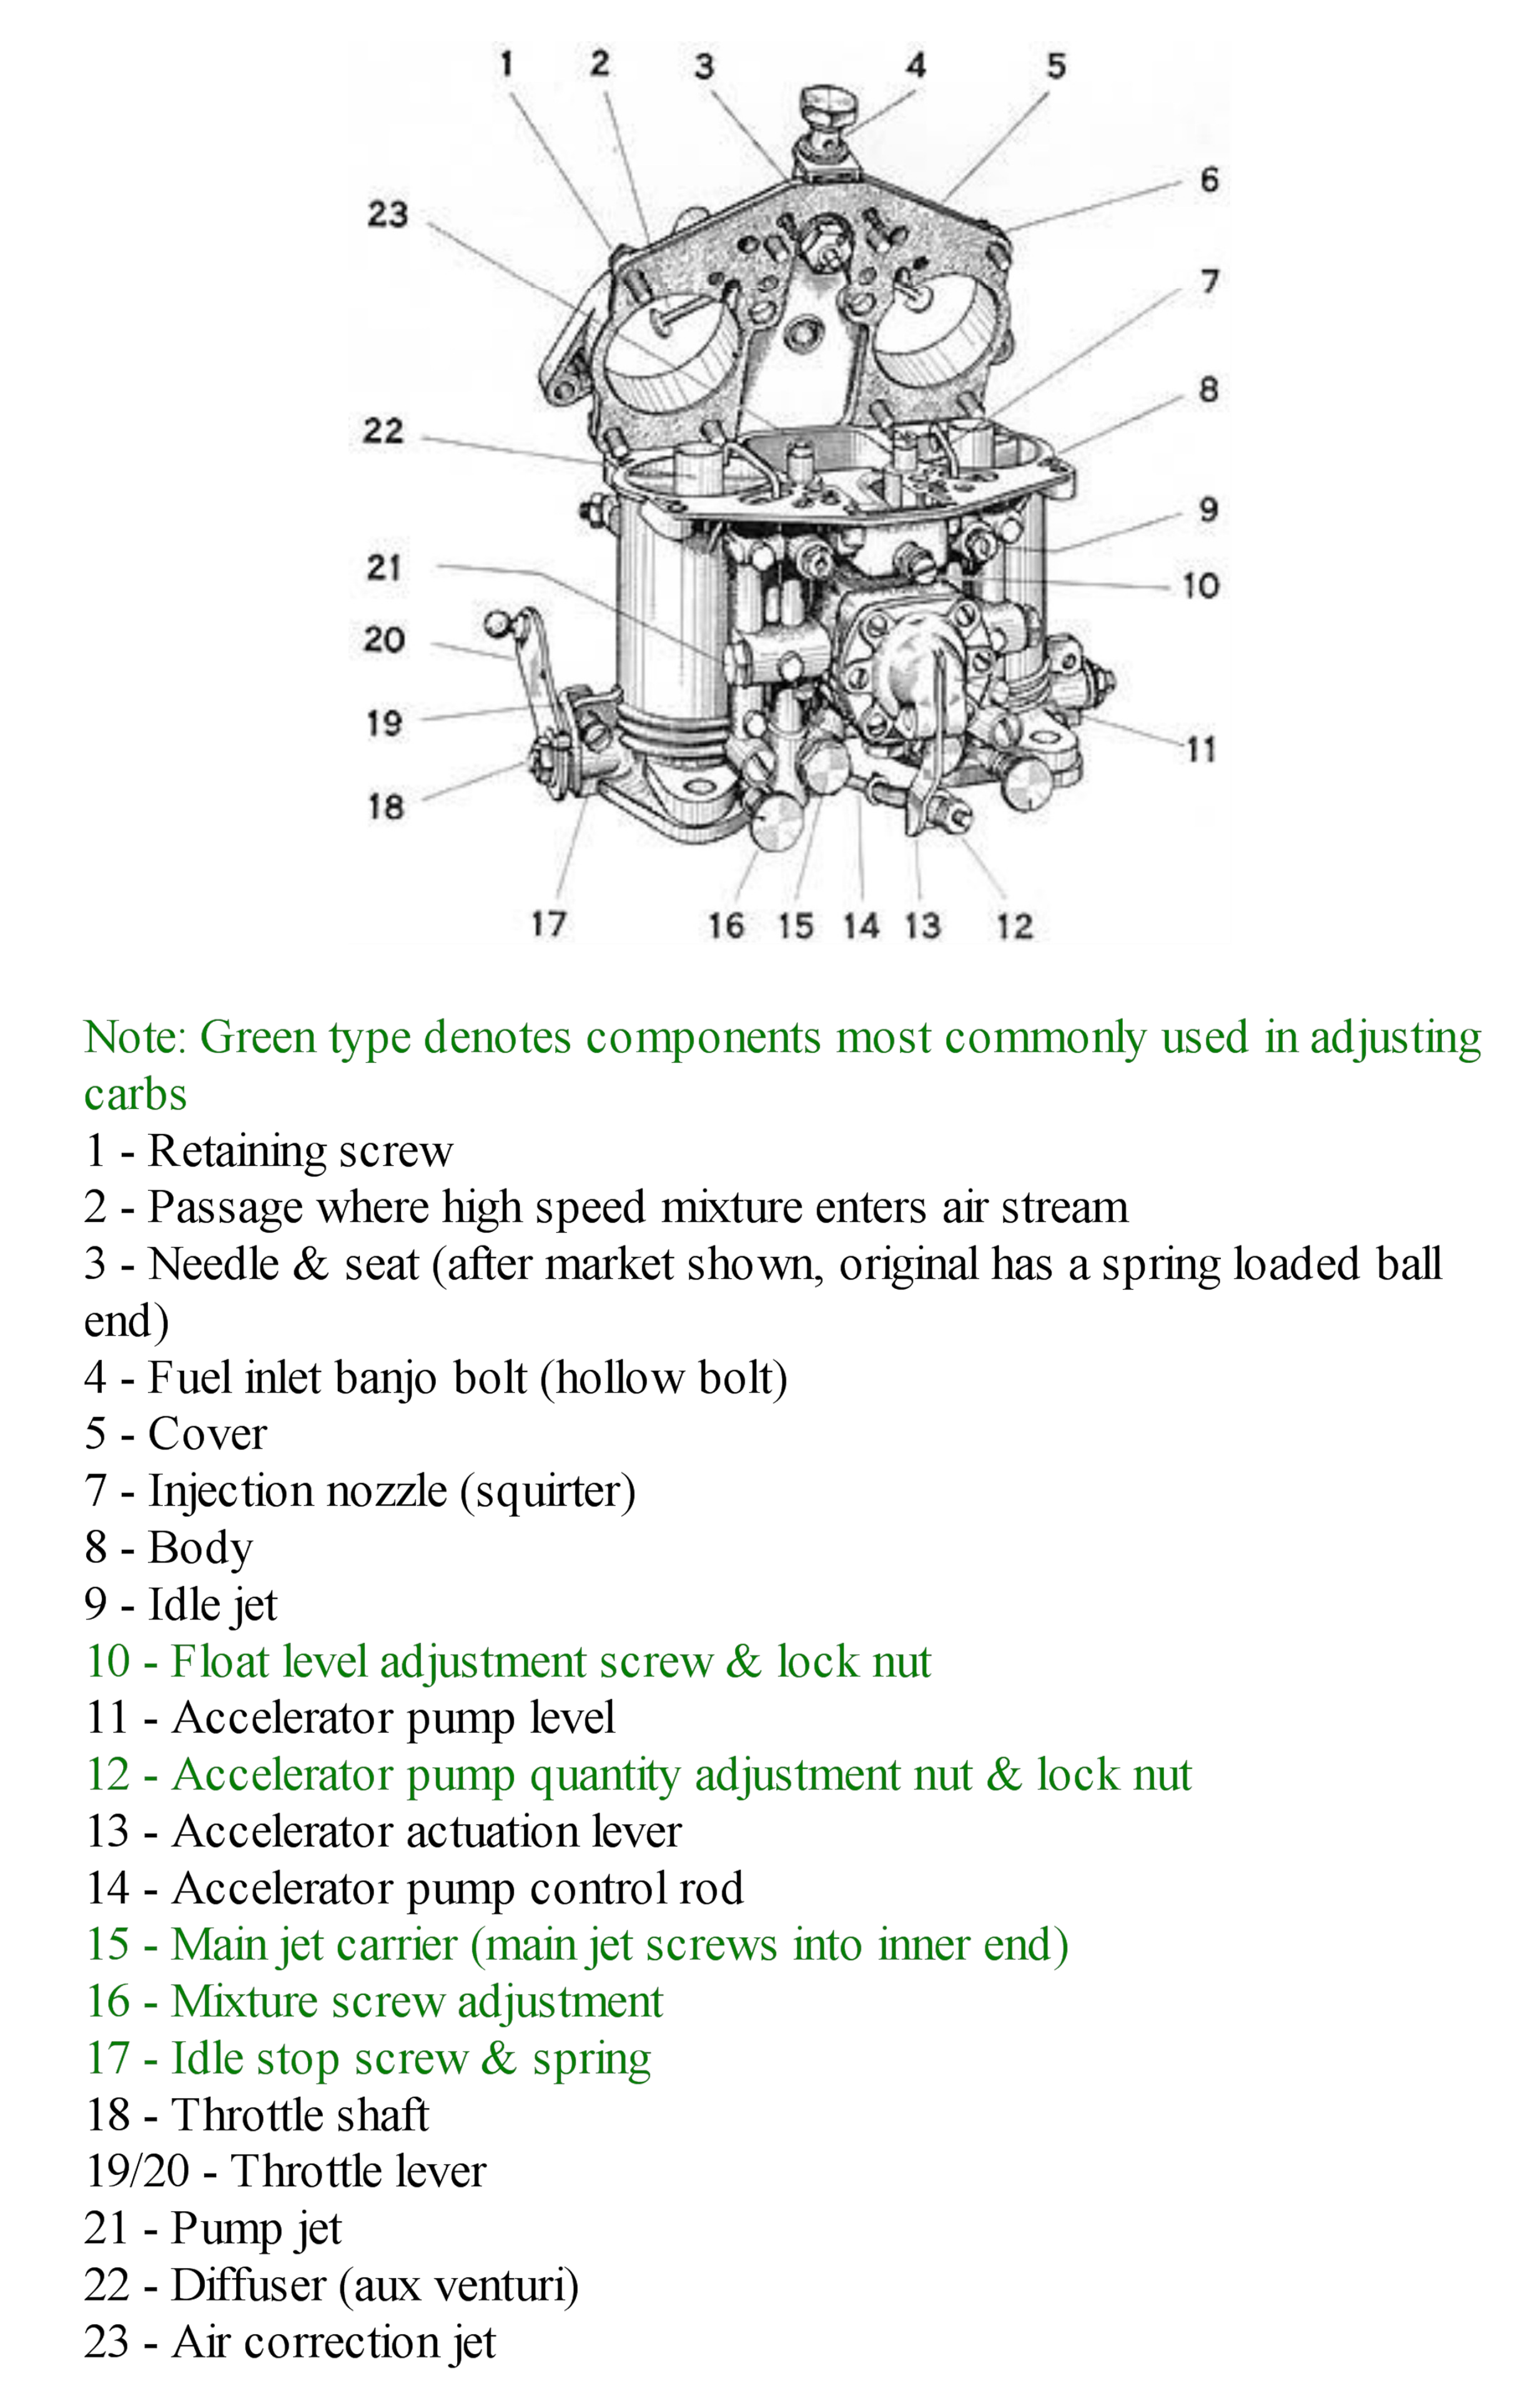
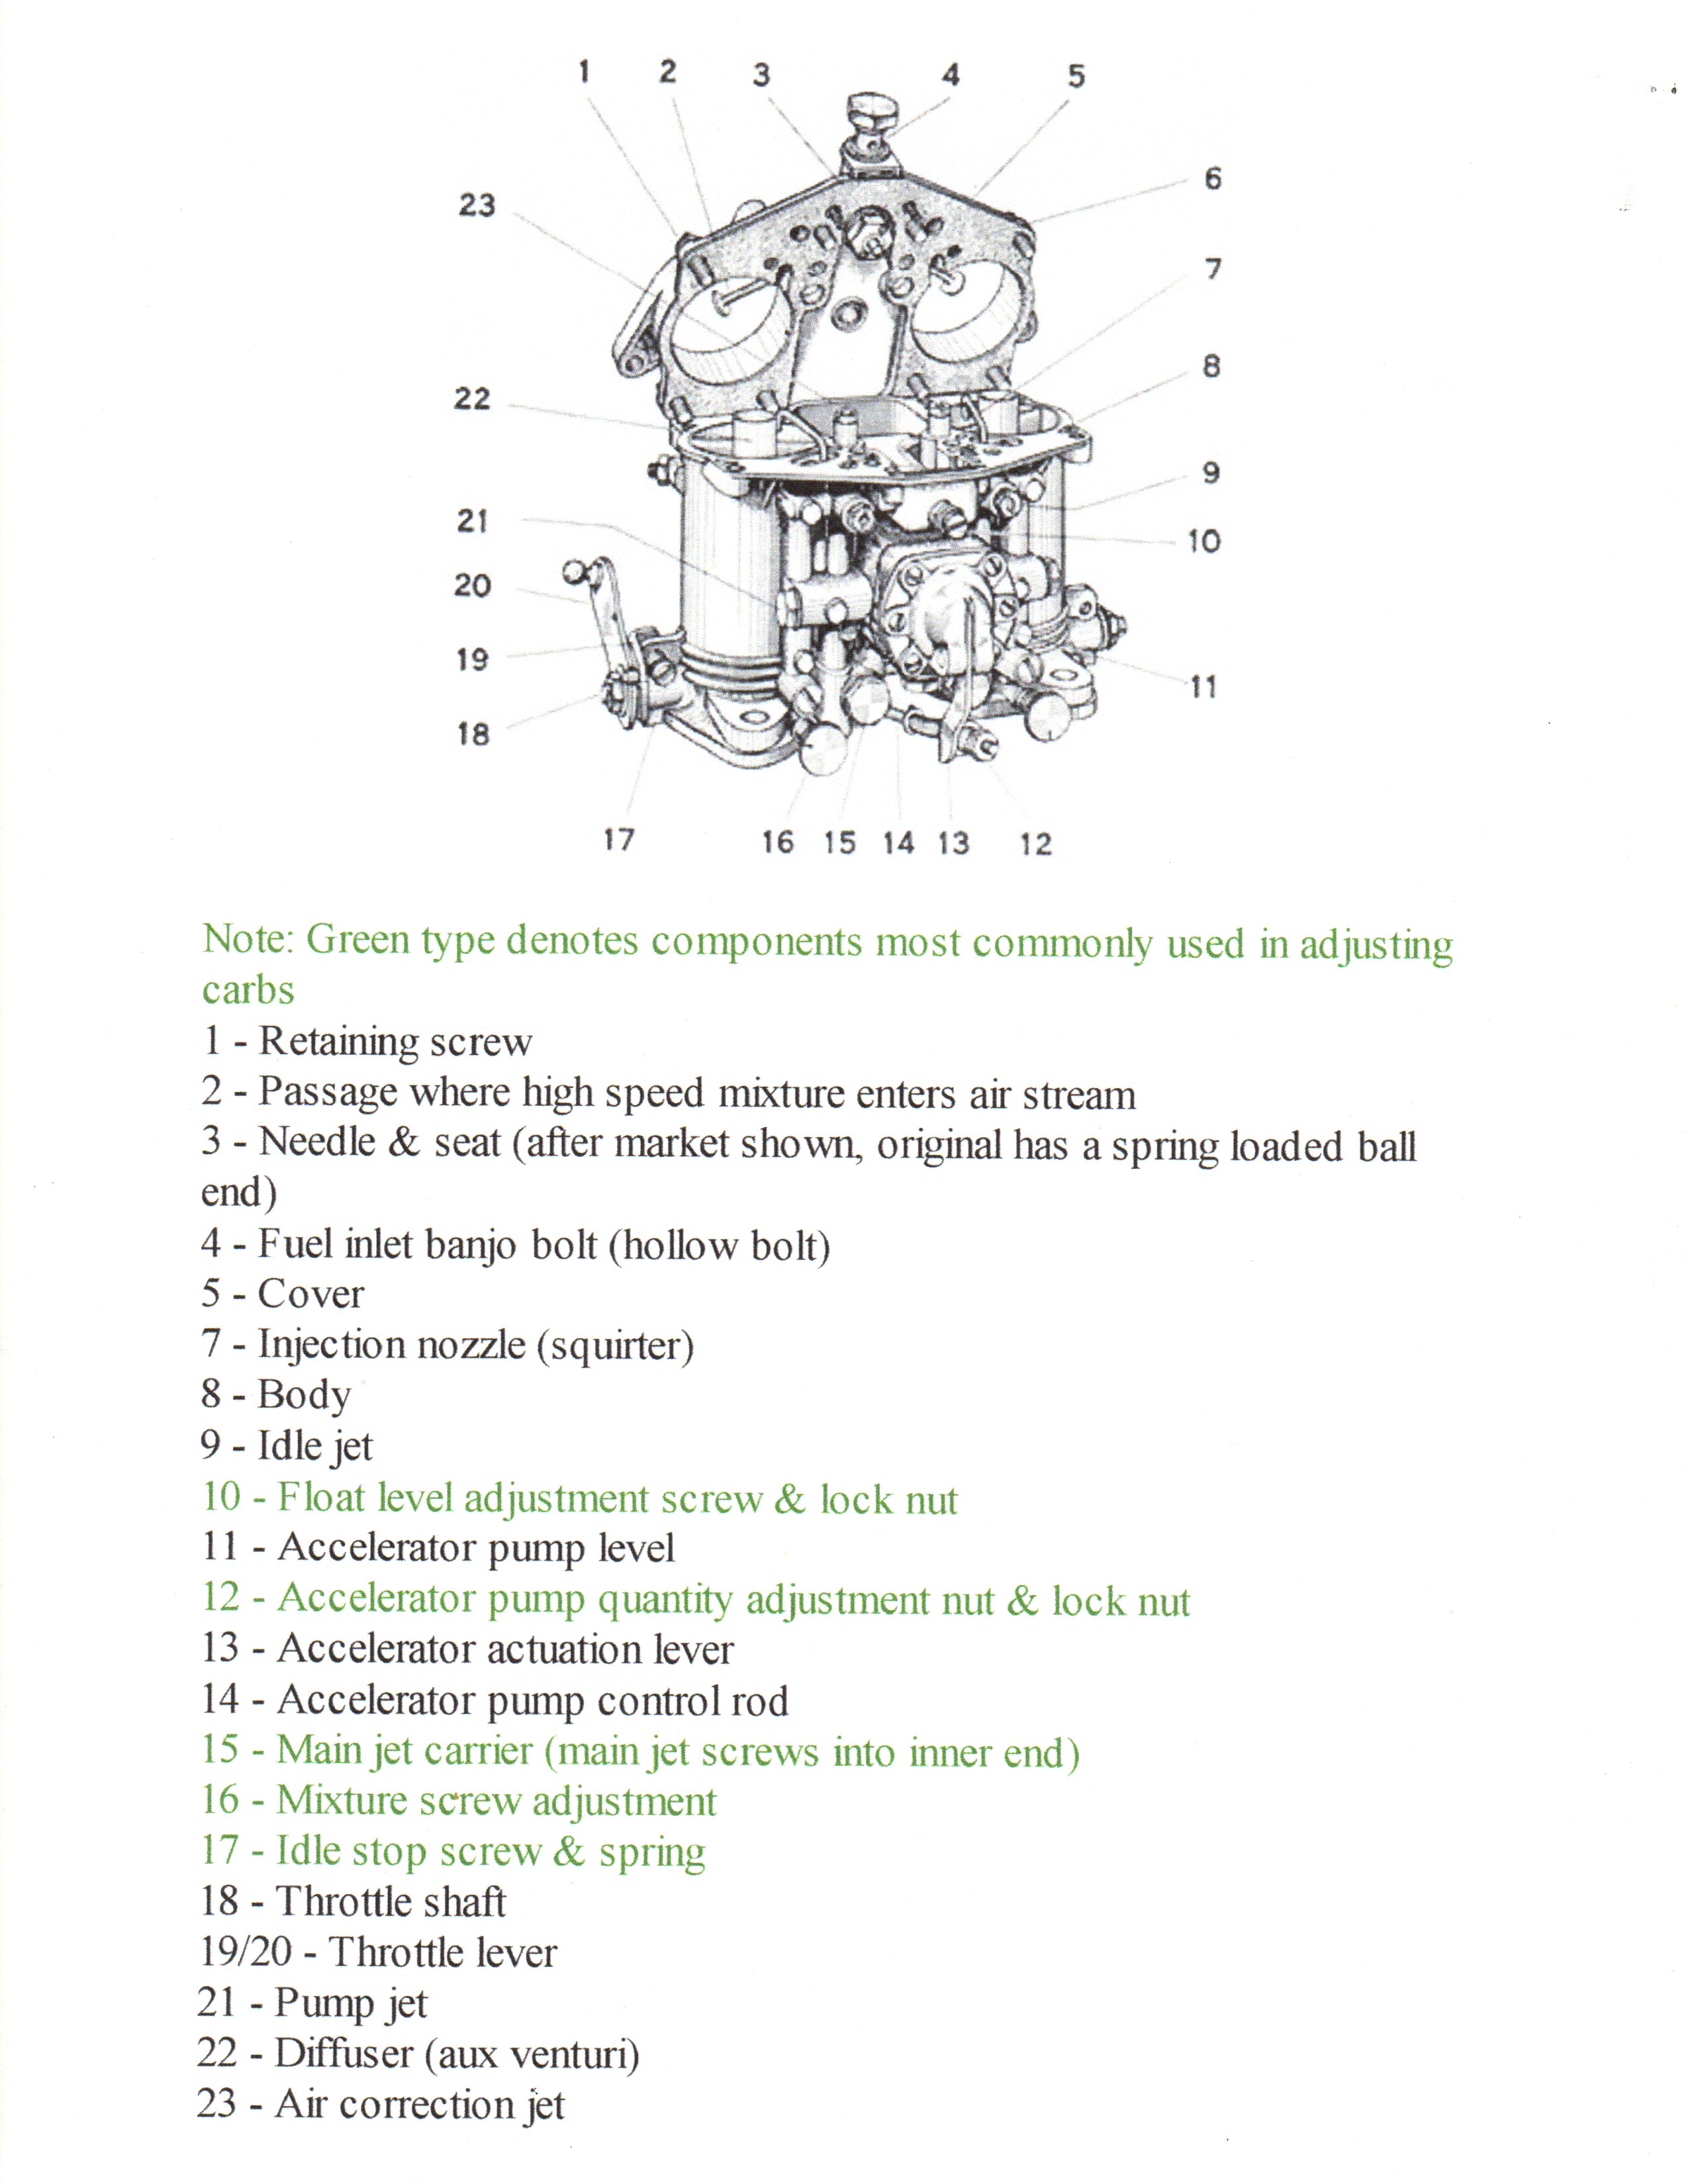
Solex diagram — click to enlarge
Duane Spencer has been kind enough to allow us to use excerpts from his book "Porsche 356, Performance Guide" to augment these instructions. Please use this link to be connected to Duane's information about setting the accelerator pump and the idle. You can also link here to Jack Stagg's article on carburetor balance and engine tuning.
- Install carburetors on manifolds — do not overtighten. The flanges on Solex carburetors bend easily, causing air leaks and potentially deforming the throat.
- Connect fuel lines and verify no leaks. Use inline fuel filters.
- Start engine and allow to warm up.
- Fine-tune idle mixture screws — start at 1.5 turns out and adjust by ear or synchrometer.
- Use a synchrometer to synchronize both carburetors for smooth operation.
Setting Solex Float Levels
Before the carburetors leave here, float levels and injection are set. Float levels are set 2mm below factory spec to offset changes in fuel formulations. When you get your carbs on the car, you may find they are still running a little rich overall (in rare cases, lean).
Float diagram — click to enlarge
If Running Rich
- Check fuel pressure off the pump — if over 3 PSI, adjust with shims or whatever is necessary for your fuel pump type.
- Adjust float: loosen 9mm nut (item 10 on the diagram), turn screw IN 1/2 turn, tighten nut, repeat on other side. Test drive the car.
- If improved but still running rich, repeat, turning the screw in 1/4 turn. Sometimes you can accomplish the same result by putting an extra shim under your float needle valve.
Reverse is true if running lean — turn out to raise float level and increase fuel in carburetor.
(Re)Setting Your Float Levels
If you are trying to establish a baseline for your own rebuilt carburetors, Jim suggests taking off the top completely and then measuring the height of your fuel. His recommendation is that it should be 2mm BELOW the straight level bottom of the sight bolt.
You can also try adjusting the injection amount by the pump rod. Loosen the two nuts, move them in to increase the injection, move them out to decrease. After setting the pump you have to measure the injection on both sides and then do the same so injection is equal on both carbs.
Phenolic Float Warning
Modern fuels are taking a toll on the phenolic floats of Solex. As there are no new floats being made, we have to reuse old ones and can never tell when that float will fail. If the float support bracket comes loose, the float can shift and get stuck and no longer "float." Adjust as needed.
Note on Shipping
When we ship the carburetors, they are laying down, which can cause the float bracket to come loose and jostle the float to an incorrect position. Yes, we could ship the carburetors standing up, which we used to do. But that caused the pump link and/or pump rod to get damaged too often. To fix that, the carbs had to come back to us. Adjusting the float is easier!
Solex Throttle Body Setup
If you are setting up your own Solex 40PII throttle bodies, here are the key steps:
Shaft Shimming
Shims from 0.1mm to 0.5mm are provided. Target total end play: 0.15–0.2mm.
Butterfly Alignment
- Check for light leakage around the butterfly when closed.
- Butterflies should be
0.03–0.04mmsmaller than the bore diameter. - Heat test at 200°F oven to verify no binding when the body expands.
- Secure butterfly screws with Loctite and peening.
Altitude & Tuning Adjustments
Make sure your electrical system is healthy and the distributor works properly. The advance should be working properly and there is no bouncing — it always comes back to the same point. Do not let anyone try to convince you that a Pertronix is the solution to a faulty distributor if you have a six volt vehicle!
Before adjusting carburetors for altitude, read your spark plugs:
- Black/wet = running rich
- Light brown/tan = correct
- Grey/white = running lean
Drive at least 20 miles and coast to a stop for an accurate plug reading. Since an idling engine will almost always run rich, your plugs should be dark from the initial idle setup process. Before making other adjustments, drive the car about 20 miles. When cool enough, check the spark plugs and compare to how they looked at startup.
When individual plugs vary one from the other, adjust the appropriate volume control setting — turning them in if the plugs are black, out if running lean. Each time you make adjustments, do the drive and check the plugs again.
Altitude Adjustments
Carburetors set for sea level performance have the proper fuel:air mixture established. As altitude increases, the actual density of the air decreases — there is less oxygen available and the fuel:air ratio is changed. There is too much fuel / too little air. So jetting has to be adjusted to bring back the proper ratio.
Rule of thumb: change main jet calibration by 6% for each 1,000m (3,280') altitude variation. Example: if normal main jet calibration at 400m (1,312') is 0115, proper jet size for 1,400m (4,592') is 0110.
For fine adjustment, volume control screws can compensate for slight altitude changes. Approximately 0.05mm jet size change per 3,000 feet. Volume control screw adjustments less than 1 turn can mean the need for a smaller jet size.
If the altitude change is temporary, you might choose to let it be, or just make adjustments in your volume control screws. But if the altitude change is great enough, or the time spent at altitude is long enough, you may want to swap out your jets.
When carburetors are tuned for altitude driving and then brought down in altitude, the opposite happens due to denser air.
When traveling between altitudes, it's better to run slightly rich than slightly lean. An engine running on the rich side will run cooler, while one running lean could get dangerously hot.
If traveling to another altitude for any extent of time, as in a vacation or Registry Holiday, a change in main jet size should be considered. Main jets are relatively easy to change. If plugs are fouling, and there is no chance to change jets, be prepared to replace the plugs regularly on the trip.
Need help with installation?
Contact us for technical support and installation questions.